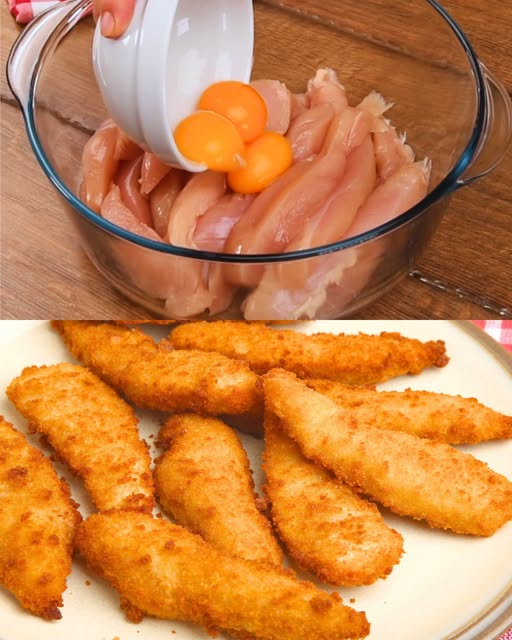
Crispy chicken strips are a universally loved comfort food, known for their crunchy exterior and juicy interior. This particular method—pouring eggs directly over raw chicken strips before coating and frying—creates a rich, well-adhered crust that locks in moisture and enhances flavor. The result is a golden, crispy coating with tender chicken inside, perfect for meals, snacks, or entertaining.
This recipe provides a complete guide, from preparation to serving, along with useful tips to ensure your chicken strips turn out perfectly every time.
Ingredients
Main Ingredients:
- 2 lbs boneless, skinless chicken breasts (cut into strips)
- 3 large eggs
- 1 cup all-purpose flour
- 1 cup breadcrumbs (plain or seasoned)
- 1 teaspoon salt
- 1 teaspoon black pepper
Optional Seasonings and Additions:
- 1 teaspoon paprika (adds color and mild smokiness)
- 1 teaspoon garlic powder
- 1 teaspoon onion powder
- ½ teaspoon cayenne pepper (optional for heat)
- ½ cup grated Parmesan cheese (for extra flavor in the coating)
For Frying:
- Vegetable oil or canola oil (enough for shallow or deep frying)
Preparation Overview
The key to this recipe is layering flavor and ensuring the coating sticks well to the chicken. Pouring eggs directly onto the chicken allows each piece to be fully coated before dredging, creating a thicker and more cohesive crust compared to traditional dipping methods.
Step 1: Prepare the Chicken
Start by trimming any excess fat from the chicken breasts. Slice them into evenly sized strips, about 1 inch wide and 3–4 inches long.
Uniform size ensures even cooking. If some pieces are too thick, lightly pound them to an even thickness using a meat mallet or rolling pin.
Place the chicken strips in a large mixing bowl.
Step 2: Add Eggs Directly to the Chicken
Crack the eggs directly over the chicken strips in the bowl.
Using clean hands or tongs, mix thoroughly until all the chicken pieces are evenly coated with egg. The eggs should cling to the chicken, forming a sticky base layer.
Why this method works:
- It ensures complete coverage.
- It eliminates the need for a separate dipping station.
- It helps the flour and breadcrumbs adhere better.
- It creates a slightly thicker, more satisfying crust.
Let the chicken sit in the egg mixture for about 5–10 minutes. This brief resting period allows the coating to bind more effectively.
Step 3: Prepare the Coating Mixture
In a separate shallow dish, combine:
- Flour
- Breadcrumbs
- Salt
- Pepper
- Any optional seasonings (paprika, garlic powder, onion powder, cayenne)
- Parmesan cheese (if using)
Mix thoroughly so the seasonings are evenly distributed.
Step 4: Coat the Chicken
Take each egg-coated chicken strip and dredge it in the flour-breadcrumb mixture.
Press gently to ensure the coating sticks well to all sides. For an extra crispy texture, you can double-coat:
- Coat once in the mixture
- Dip briefly back into the egg mixture
- Coat again in the dry mixture
Place the coated strips on a plate or tray. Let them rest for about 5 minutes before frying. This helps the coating set and reduces the chance of it falling off during cooking.
Step 5: Heat the Oil
Pour oil into a deep skillet or frying pan until it is about 1–2 inches deep.
Heat the oil over medium heat until it reaches approximately 350°F (175°C). If you don’t have a thermometer, test by dropping a small piece of coating into the oil—if it sizzles immediately, the oil is ready.
Step 6: Fry the Chicken Strips
Carefully place the chicken strips into the hot oil, making sure not to overcrowd the pan.
Fry in batches if necessary.
Cook each strip for about 4–5 minutes per side, or until:
- The coating is golden brown and crispy
- The internal temperature reaches 165°F (75°C)
Turn the strips occasionally to ensure even cooking.
Step 7: Drain and Rest
Once cooked, remove the chicken strips and place them on a plate lined with paper towels or a wire rack.
This allows excess oil to drain and helps maintain crispiness.
Let them rest for a few minutes before serving.
Serving Suggestions
These crispy chicken strips are versatile and can be served in many ways:
- With dipping sauces such as honey mustard, barbecue sauce, ranch, or spicy mayo
- Alongside fries or potato wedges
- In wraps or sandwiches
- Over salads for added protein
- As a party appetizer platter
Texture and Flavor Profile
This cooking method produces:
- A crunchy, golden-brown exterior
- A moist and tender interior
- A well-seasoned coating with balanced flavors
- A satisfying bite due to the thicker crust formed by the egg coating
Tips for Perfect Results
- Use Fresh Oil: Clean oil ensures better flavor and color.
- Maintain Oil Temperature: Too hot burns the coating; too cool makes it greasy.
- Do Not Overcrowd: This lowers oil temperature and causes uneven cooking.
- Rest Before Frying: Helps the coating adhere better.
- Double Coat for Extra Crunch: Especially useful if you like a thicker crust.
- Cut Even Pieces: Ensures all strips cook at the same rate.
Alternative Cooking Methods
Oven-Baked Version
Preheat oven to 400°F (200°C). Place coated strips on a lined baking sheet and spray lightly with oil. Bake for 20–25 minutes, flipping halfway through.
Air Fryer Version
Preheat air fryer to 375°F (190°C). Arrange strips in a single layer and cook for 10–15 minutes, turning halfway through.
These methods reduce oil usage while still delivering a crispy result.
Variations
- Spicy Version: Add chili powder or hot sauce to the egg mixture.
- Herb-Coated: Mix dried herbs like oregano, thyme, or basil into the coating.
- Cheesy Crust: Increase Parmesan or add shredded cheddar to the coating mix.
- Gluten-Free: Use gluten-free flour and breadcrumbs.
Storage and Reheating
Store leftover chicken strips in an airtight container in the refrigerator for up to 3 days.
To reheat:
- Oven: 375°F (190°C) for 10–12 minutes
- Air fryer: 350°F (175°C) for 5–7 minutes
Avoid microwaving if possible, as it softens the crust.
Nutritional Overview
Chicken strips provide:
- High-quality protein
- Moderate fat (depending on frying method)
- Customizable seasoning for controlled sodium levels
Using alternative cooking methods like baking or air frying can significantly reduce fat content.
Final Thoughts
Pouring eggs directly over chicken strips before coating is a simple but effective technique that enhances both texture and flavor. It streamlines the preparation process while producing a thicker, crispier crust that holds up well during frying.